Soaring the Blairstown Southeast Ridge

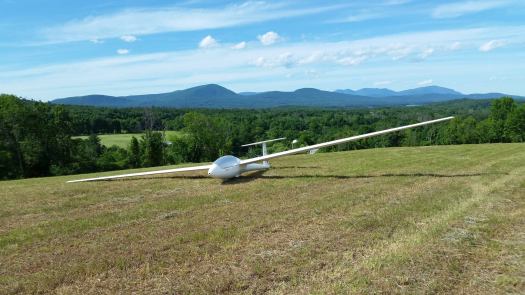
One of the most magical experiences is soaring the smooth and wonderful southeast ridge. We tend to get fewer soarable SE days and we treasure the ones that we do. Because SE days tend to be less common, our training resources are mostly geared toward the NW side. Figuring that a briefing would be useful, this overview builds on the ACA Local Ridge Training guide to provide some guidance for our beginner and intermediate pilots. First, we will discuss the weather systems that drive these days, followed by the characteristics and topography of the “local ridge”, and finally how to fly cross country to Hawk Mountain and beyond.

Key Points

  • Please reference the “Blairstown SE Ridge” layer on the Ridge Map for detailed information.
  • SE days usually start late in the day, with weak initial winds that get stronger toward sunset.
  • Bailout altitude during ridge testing for beginners to return to Blairstown Airport:
    • 2000ft MSL in a 1-26
    • 1800ft MSL in high performance
  • Expect tricky weather: rain, low clouds, and lower visibility. This is especially so when the winds are easterly.
  • The SE side works with less wind strength and is more tolerant of off angles compared to the NW side. However, this can make the ridge lift less consistent. Certain sections may not work at all and others may be strong.
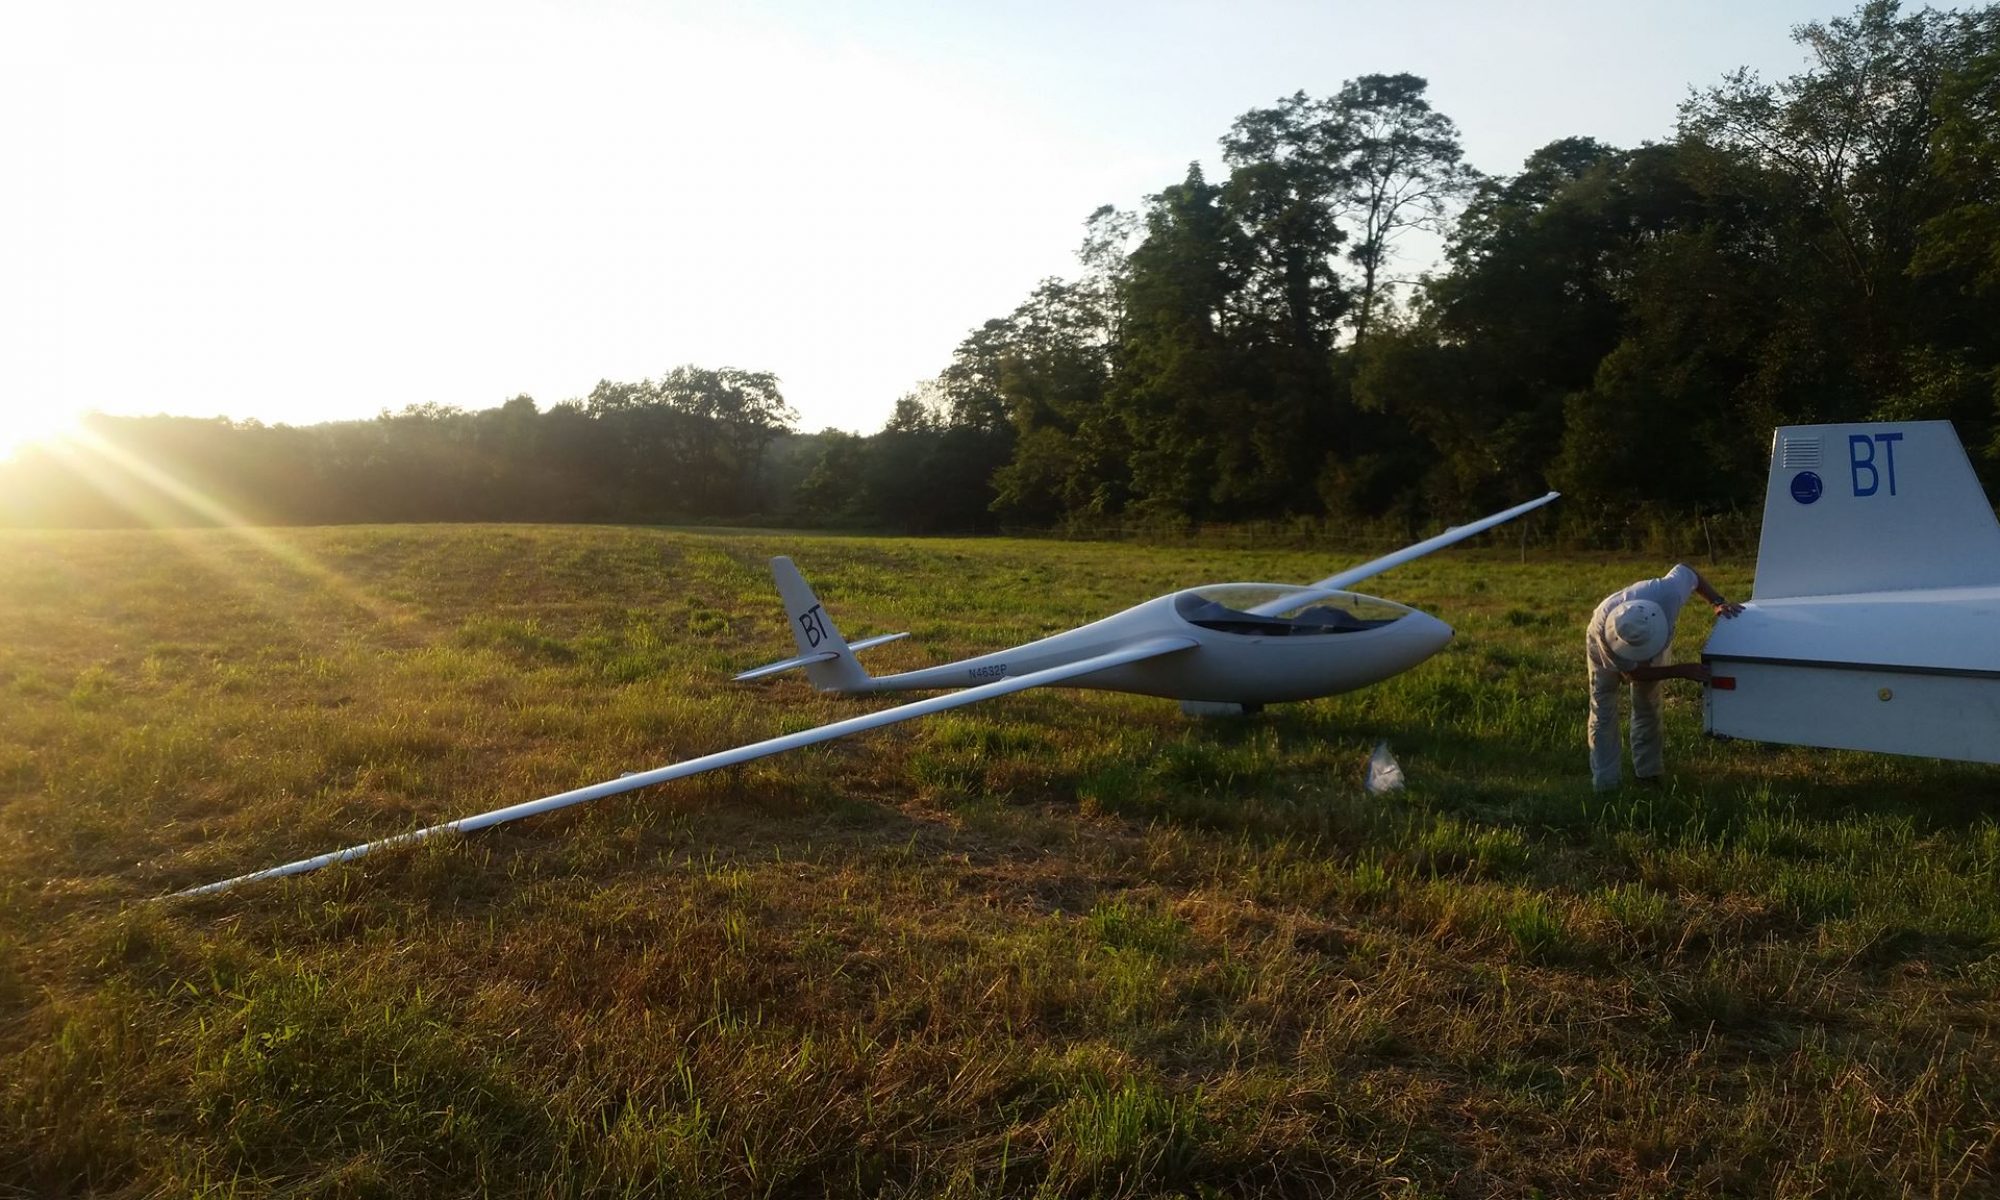
  • Due to the stable conditions, ridge landouts are more likely. Expect that you can fall off the ridge at any time.
  • The local ridge is from the Upper Reservoir to the Hang Glider landing zone. The section from the Delaware Water gap to the Hang glider zone is somewhat broken up and tends to be softer.
  • The ridge band is usually narrower horizontally and has a stronger vertical gradient than on the NW side. (Ie: You may find the ridge is hardly working at 2000ft MSL and yet you can go 100 mph at the treetops.)
  • For pilots going cross country, the area NE of the Upper Reservoir is mostly unlandable and dangerous.
  • The area between the Bangor Offset and Wind Gap has no immediate fields underneath, requiring staying at or above ridge top to stay in glide of the few landing options.
  • The sections near Lehigh Gap and Bake Oven Knob tend to get softer.
  • For pilots flying southwest of Swatara Gap, contact Muir at 126.2 to cross the Class D airspace.

(Note: It is the pilot’s responsibility to study off-field landing options on The Ridge Map/Google Earth. This means reading the comments, measuring the distance of the field, assessing slope, and distance from the ridge. This briefing will guide your attention as to which fields to look at, but it is out of scope to describe the whole plan for approach and landing.)

Weather

Soarable SE days are a sharp contrast to NW days as they tend to have more stable, continental, or maritime air. Synoptically, the most common setup is a receding high-pressure system. A day or two beforehand, we usually experience a NW day as the high builds in west to east. Later, we are in the middle of the system, resulting in no wind. Finally, as the system recedes into the Atlantic, the wind picks up again, in a southeasterly direction.

Because the wind starts later in the day, the soarable “window” is often much shorter than on the NW side. Reviewing OLC traces, exceptionally few SE days result in flight durations exceeding 5.5 hours, with pilots often landing close to sunset.

The result is that a pilot launching early (often 11am-2pm) should expect a low inversion, weak winds and possibly a non-working ridge.

The more “easterly” the wind direction, the wetter the air as the air travels a shorter distance from the Atlantic. The more “southerly” it is, the drier the air.

As a result of the moisture, we generally expect few thermals, stable atmosphere, lowered visibility, and rain in the latter half of the day.

While this is a prototypical synoptic description, we will occasionally get special weather systems that alter these assumptions. However, most of the “issues” described as they relate to cloud cover, rain, and stability tend to cut across most SE days.

Soaring in Stable Conditions

Glider pilots overwhelming fly in “fair” weather, usually postfrontal systems with good thermals. SE days can strongly contrast with such weather and require an alternate mindset.

Aside from the fewer, weaker, and lower thermals, stable weather can bring rain, low visibility, fog, and lulls in the wind patterns. The adage that “you can be on the ground in two minutes at any time on a ridge” is particularly apt for the SE side.

Note that when you see any change in the airmass ahead of you, such as more cloud cover, rain, or lower visibility, this is likely to negatively affect the wind velocity. Always be prepared to land in such circumstances.

Note that most gliders lose considerable performance flying in rain.

If the temperature is cold enough, you may encounter freezing rain and experience icing conditions.

If the overcast layer is low, it can descend down to the ridge top and later even obscure the mountain. On especially moist days, expect the cloud layer to descend in the latter half of the soarable day.

As a rule, the more “easterly” the wind, the more likely you are to experience complications with wetter air.

Ridge Weather

Thanks to smoother air and a well-defined SE slope, the SE ridge needs less wind to “work” and is more tolerant of poorer wind angles than the NW side. Acceptable margins are determined by the pilot and their mentor.

  • Wind Speed at Ridge Top:
    •  8-10 knots (weak local ridge)
    • 10-13 knots (moderate ridge: Float at 2000ft MSL @ best glide speed)
    • 13 knots+ (strong ridge: Float at 2400ft)
  • Wind Direction:
    • Optimal ~150 degrees
    • Range: 110-190 degrees

If the pilot intends to soar the ridge at the more marginal wind speeds and/or wind angles, the ridge may work better than in similar conditions on the NW side. However, the margin between “working” and “not-working” is very thin. If the wind drops a knot or two when the conditions are marginal, the ridge lift can abruptly shut off. Pilots should be cautious and prepared to land at a moment’s notice.

Topography

The SE ridge is much more prominent, and steeper compared to the NW ridge. The steeper angle increases the vertical component of the ridge lift, making the lift stronger, or require less wind for a comparable lift strength. However, a steeper angle also makes the lift band narrower in width. With weaker winds, the lift band is approximately two or three wingspans wide, with a very narrow sweet spot. Extra care must be taken to maintain position laterally, with most beginners struggling to do so and “hunting” back and forth in the lift.

Flying the Local SE Ridge

The local SE ridge is defined by the Upper Reservoir and the Hang glider launch site.

After tow, pilots must maintain strict gliding distance to the airport as they test the ridge. Often, this means staying within a mile of the Upper Reservoir. Once satisfied the ridge is working, the pilot may fly southwest toward the Delaware Water Gap, finding an excellently shaped mountain. The base of the ridge is heavily forested. However, the glider can maintain an adequate glideslope to the base of the valley by Rt.94, so long as the pilot stays at or above the ridge crest.

Crossing the Delaware Water Gap is usually easy, with lift often encountered in the middle. The landing options on the SW side of the Gap are Slateford Farm and the Pumphouse Fields. Both fields are marginal and require study to consider as landing options. Note that the section between the Delaware Water Gap and the hang glider field is somewhat broken up and lower than the preceding section. If the wind is marginal, you are more likely to fall off in this section. As a result, most Blairstown pilots will usually float through this section on anything other than the strongest days.

The next field is near the hang glider launch. Their landing zone is a short (~1000ft), but wide field surrounded by trees. Exercise caution in higher performing gliders as this field requires a steep approach.

Note that small weather shifts can have a large impact on the SE ridge. As a result, take care to study these landing options beforehand and always have a plan. Make sure to always maintain minimum energy (~150ft above the trees at best glide speed) if the ridge softens up. In the event the ridge is not sufficiently supporting the glider, make a decisive decision to land at a landing option. Failure to do so will expose the pilot to considerable risk.

Thermal Band

The SE ridge has a distinctly different thermal composition than the NW side as it remains in sun most of the day. As a result, powerlines, rock faces, and escarpments directly build and feed in thermals. With some experience, pilots will routinely be able to anticipate thermals in known hotspots along the ridge.

Thermal activity is often weak, and the top of the lift is usually fairly low (2400ft-4000ft MSL). Further, the thermal activity tends to be restricted mostly to the ridge.

On more southerly days, the thermals can become more turbulent and energetic. With weak winds, this can disrupt the wind flow and make the ridge band not workable. However, when the SE ridge side bakes on sunnier, southerly days, you can find closely spaced, anabatic-reinforced thermals resulting in good air 500-1500ft above the ridge.

Ridge Arrival

Returning from the SE ridge is usually not stressful compared to coming back from the NW ridge as there is little to no sink. In fact, many pilots will encounter good air over the slightly sloped terrain between the airport and the ridge. As a result, leaving at 2000ft MSL in a 1-26 and 1800ft MSL in a higher performing glider at the Upper Reservoir is adequate for a safe arrival. This approach path lines you up with the Dairy Queen field, which is an excellent alternative option.

Always be prepared to make an abbreviated pattern, normally a left-hand base-to-final on 7. Use caution entering the landing pattern as the SE wind puts the glider upwind of the airport, requiring to crab accordingly. If you are low, you may encounter sink and gusty conditions due to being in the lee of the airport hill. Finally, expect a moderate tailwind on base leg and take care to avoid button-hooking the turn.

Soaring the SE Ridge Cross Country

The SE ridge in many ways is considerably more benign than the NW side, with fewer large transitions and more landable terrain. However, it has several traps that the pilot must take care to avoid. Further, the weather is much more finicky, which increases the likelihood of falling off the ridge.

We generally advise against flying further NE of the Upper Reservoir as the landability becomes quite poor.

To fly cross country on the SE ridge, the pilot must be cross country ridge approved.

Bangor Offset

Heading SW of the hang glider zone, the pilot will encounter the Bangor Offset. This presents a formidable transition to a SGS 1-26 and requires respect even in a high-performance ship. The most notable challenges are:

  1. The initial ridge section SW of the offset favors an easterly wind. Use caution on more southerly days as it requires going farther to encounter the lift.
  2. The landability at the base of the ridge is quite poor from the Offset to Wind Gap. This requires maintaining in marginal gliding distance several landing options, noted in the figure above. The pilot must study and preselect these options before starting the transition.

Wing Gap to Hawk Mountain

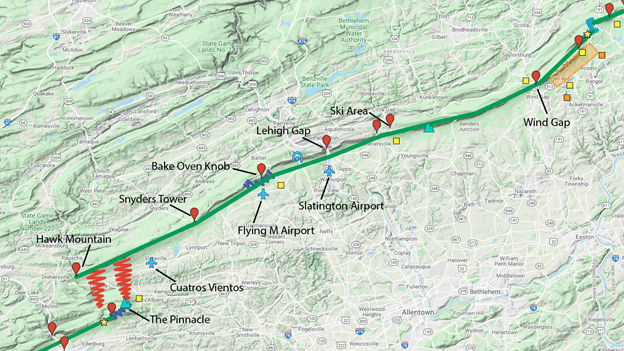
After Wind Gap, the landability is moderate and the ridge is well defined. Note that Allentown Class C airspace requires to fly under 2800ft between Wind Gap and Lehigh Gap. Caution must be exercised after the Ski Area through just beyond Lehigh Gap as this section tends to get softer. Similar caution should be exercised near Bake Oven Knob, which tends to be weaker. The ridge approaching Hawk Mountain works well, despite being behind the Pinnacle. Other than very southerly days, it is possible to fly all the way to the “wall” with solid ridge lift.

Slatington, Flying M, and Cuatros Vientos are excellent airports and serve as reliable landing options.

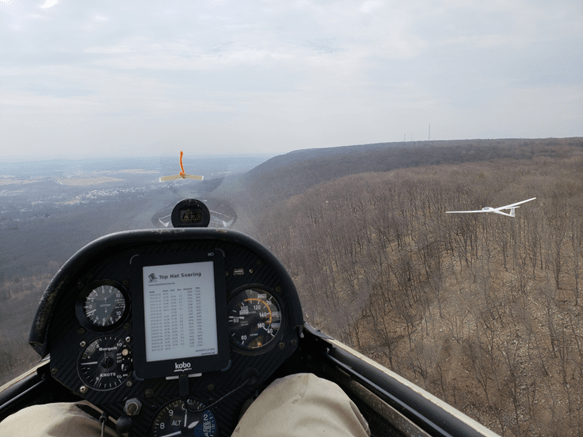
The Pinnacle Transition

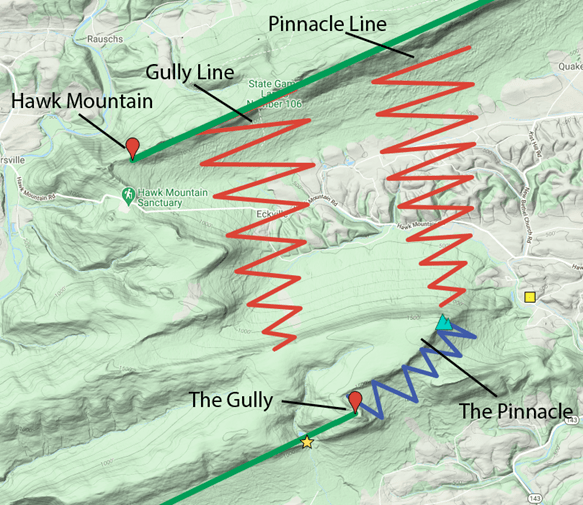
The transition beyond the Pinnacle can be quite challenging despite being only 3.5 miles in distance. Generally, more southerly days will have better thermals which makes this transition more possible. Lift lines usually set up snaking around the Pinnacle and behind a gully. Both methods are acceptable, however, crossing around the Pinnacle is safer than crossing over the top of the mountain.

In either event, be prepared for strong lee sink after committing to the transition. Mark your alternate landing option before the corner, or behind the mountain respectively. Do not commit to cross unless you are absolutely sure that you have enough energy to do so. Once you come around the corner, be prepared for the ridge not to work and land at another option further ahead.

Returning NE-bound is usually less difficult. However, occasionally the thermal activity can fall apart, causing the pilot to get stuck on the Pinnacle. This can tempt a low, downwind return back to Hawk Mountain. In this case, be prepared to land at the base of the ridge if you are coming up short.

Beyond the Pinnacle

Once the transition is complete SW bound, soaring beyond the Pinnacle is usually fairly benign. The ridge has a more rounded shape but works very well even down at ridge top. The landability is quite good in all but a couple small sections.

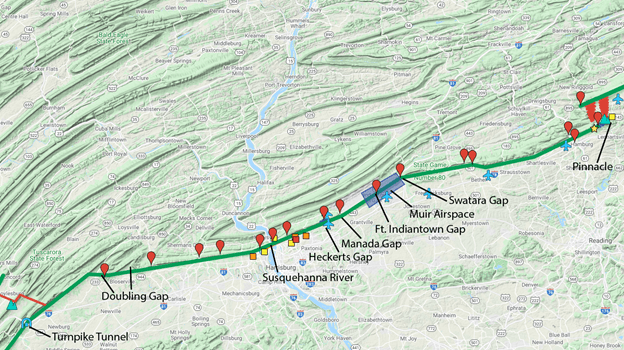
Approaching Swatara Gap, call Muir Tower on 126.2 to cross their airspace. Sometimes they will not let you pass if the shooting range at the base is “hot”. Muir airspace extends to Fort Indiantown Gap.

The ridge beyond Fort Indiantown Gap becomes somewhat lower and less defined, but typically still works well. Be careful at Heckert’s Gap if flying low and fast, as the ridge dips down and the lift softens up.

Approaching the Susquehanna River, the landability becomes poor. There are several landing options, although immediately by the river it is densely populated. Exercise caution crossing the river to maintain gliding distance to ridge top on the other side.

The ridge is excellent between the Susquehanna river and Doubling Gap.

Doubling Gap, while a large transition, tends to have good air through the whole area. With moderate winds, high performance gliders can sufficiently float up going in both directions that this gap does not serve as a major obstacle.

Beyond Doubling Gap, the ridge becomes prominent and excellently shaped. The ridge starts to strongly favor an easterly wind, so exercise caution on southerly days. The typical turnpoint in this region is the Turnpike Tunnel (500km out and return). Beyond the tunnel is an ammunition dump with a prohibited zone above it, which precludes the ability to continue on the windward side.

[Advanced Pilots Only!]

On the perfect day, it is possible to drop back to the Tuscarora Mountain and continue to Burnt Cabins and Dickey’s Mountain. Then, to return to Blue Mountain at Fort Loudon. Finally, approach the prohibited zone from the SW side. It is easy to get around the prohibited zone going NE bound as you would be going from a high to a low ridge and can easily skirt the perimeter of the airspace.

Soaring Northeast of the Upper Reservoir

We will periodically go to Catfish Tower, which has an occasionally landable Christmas tree farm at its base. Note that when heading SW bound again it is possible to get stuck on this ridge, unable to make the crossing back around the Upper Reservoir offset. In this case, the pilot has the option to go downwind and land in the cornfield near the former Model Airplane Field.

If heading NE of Catfish Tower and crossing the Millbrook Powerline, the ridge remains well defined all the way to the Cliffhouse. While there is no house there anymore, this knob marks the end of the commonly flown SE ridge. This area is completely unlandable.

[Advanced Pilots Only!]

Some pilots have flown farther, to Culver Lake and even High Point; however, this is highly technical soaring. The ridge requires a more easterly wind and is moderately-poorly defined in most of these sections. Further, easterly days tend to have few thermals and rain/cloud issues, which further complicate flying this section.

Useful Resources

SE Ridge Stories

OLC Traces

  1. Local Ridge/Short XC
  2. Cross Country

Landouts

(Note: There have been many more landouts over the years. These were selected from those that were more recent and had a flight trace.)

Knowledge Quiz

  • What are the geographical limits of the local ridge?
  • What is the optimal wind direction for the local ridge?
  • How strong does the ridge need to be for the ridge to work moderately well?
  • What is the bailout altitude from the Upper Reservoir back to Blairstown Airport?
  • Describe the arrival path back to the airport.
  • Describe challenges you may encounter in a standard traffic pattern at Blairstown airport on a stronger wind SE day.
  • Does the SE ridge usually start strong and get weaker, or start weak and get stronger?
  • What kinds of things do you need to worry about on stable days?
  • Name the three best landing options between the Delaware Water Gap and hang glider zone. Describe their challenges and how you would land in them.
  • Why do we avoid flying NE of the Upper Reservoir?
  • What are the landing options between the Upper Reservoir to Catfish Tower?
  • Describe the Bangor Offset transition (both NE and SW). What are the challenges? Name the landing options, their issues and your planned approach and landing into them.
  • Name the key landmarks between Wind Gap and Hawk Mountain.
  • Which two areas between Wind Gap and Hawk Mountain does the ridge lift get soft?
  • Name the three airports at the base of the ridge between Wind Gap and Hawk.
  • What is the name of the airport that has the Class D airspace on the ridge? What is its frequency?

Daniel’s Ridge Commandments

Violate these commandments at your own peril, for the Almighty Ridge will smite those who fail to respect it.

  1. Thou shalt be proficient and prepared to tow in windy conditions (eg: Checklists complete, no loose articles, belted in tight, emergency plan prepared, familiar with tow signals, etc.)
  2. Thou shalt test the ridge with a landing option in glide and your approach planned.
  3. Thou shalt not fly low and slow near a ridge (eg: < 150ft AGL AND < best glide speed).
  4. Thou shalt not drift downwind of the ridge band!
  5. Thou shalt not turn toward the ridge.
  6. Thou shalt s-turn until sufficiently above a ridge (min: 200ft AGL, 400ft better)
  7. Thou shalt turn nose low, coordinated, and with sufficient airspeed (eg: best glide speed).
  8. Thou shalt not fly into a box canyon.
  9. Thou shalt have a landing option in glide and approach planned at every moment when completing a transition to another ridge.
  10. When approaching an unlandable area, thou shalt reassess the conditions and establish your landing options/approaches ahead and behind you.
  11. Thou shalt not fly on the downwind (lee) side of the ridge!
  12. Thou shalt respect the right of way rules: Right wing to the ridge has the right of way.
  13. Thou shalt be proficient and prepared to land in windy conditions. Maintain extra altitude and airspeed during approach/landing. (eg: +200ft above IP, +15-20 knots in the pattern, turn final 100-200ft higher and land long down the runway if practicable.)

And if you’re flying at a site that requires soaring back to your airport:

Thou shalt establish and maintain a minimum margin to return to the airport (eg: Blairstown – 2400ft in a 1-26).

___________________

Note that these margins are provided as ballparks and may need to be adjusted for a given ridge site, sailplane, conditions, and the experience of the ridge pilot.

Why Thermal in a Slip? | And the Hazards of Skidding

Experienced soaring pilots usually advise thermalling in a slip. Dick Johnson in the October 2004 issue of Soaring magazine provides an excellent technical explanation for how and why to use this technique.

The bottom line is that a turn requires a combination of pitch, bank, and yaw to maintain a stable configuration. And it requires some compromises to achieve the most efficient combination.

If you thermal fully coordinated, you will need to use top aileron to avoid “falling into the turn”. If you slip using top rudder, you will minimize or even eliminate the top aileron. You are compromising by dragging the fuselage through the air stream, while making the wing cleaner.

It seems like some combination of top rudder and top aileron is often most efficient.

Conversely, turning with ANY amount of skid is VERY inefficient. The MORE you skid, the MORE top aileron you need to avoid falling into the turn.

In this case, you are BOTH dragging the fuselage through the air stream AND using quite a bit of aileron to keep the turn stable. This is very bad!

I notice that many pilots thermal with a heavy inside foot, resulting in a skidding turn. Aside from being more spin prone, even a minor skid will be very draggy!

Next, skidding into a turn (leading with the rudder) makes the glider especially spin prone. Initially you rudder into the turn, followed by feeding in back stick and opposite aileron to stabilize the turn. This serves to load up the glider while putting in control inputs that aggravate stalling/entering a spin.

This is especially dangerous in the pattern. Many pilots have a tendency to over-rudder their turns while on approach.

Here is a scenario that can easily result in a stall/spin. A low and slow base leg, followed by an over-ruddered, button-hooking turn.

As you start turning, you use too much rudder. This is followed by pulling back to get the turn established. And finally, feeding in opposite aileron to keep the glider from falling into the turn. This results in the glider departing into an unrecoverable spin.

Building Your Toolbox | Responsibly Developing Your Margins

Many accidents in soaring are while flying cross country, particularly during landouts. Most landout related accidents have little to do with unexpected occurrences in a good field. Instead, they have more to do with the situational awareness, judgment, and decision making of choosing an appropriate field at the right time and selecting the right time to quit soaring and land.

Most pilots get injured or killed in the stall/spin during low thermalling, or a poorly planned approach into the field. Or, neglecting the field selection process until it’s too late and the nearest field is unsuitable due to obstacles, slope, or wires.

I’d like to focus on low thermalling and approach planning. What is extremely disconcerting is that pilots do dangerous things near fields. Dangerous is a relative term; what is unsafe for one pilot is “safe” for someone else with more skill, experience, and practice.

However, what is scary is that pilots who are generally “conservative” near their home airport under the close eye of their fellow club members will often take “chances” while flying cross country.

An explanation for this behavior is that it is an example of loss aversion. Pilots confuse being risk-averse/conservative with simply finding losses being painful. Rather than being conservative with respect to landouts, they simply really really don’t want them to happen due to their inconvenience or feeling embarrassed. And if they find themselves getting lower near a field, they will be MORE tempted to take chances to avoid landing out!

If a pilot is conservative, they will select a good field EARLIER and quit at a HIGHER altitude, rather than taking chances near fields! Instead, a loss averse pilot accepts safety risks to minimize their likelihood of accepting a loss.

To stem this behavior, I suggest developing a toolbox of skills and margins. Think of this like an athlete. You practice at your home court, your gym, your own pool or your personal track. And when you go to a meet, now you put your skills to the test.

Just like you shouldn’t try out a novel swimming technique while competing against other swimmers, you shouldn’t be experimenting with anything you haven’t practiced before while flying cross country. Especially as it relates to safety!!!

The toolbox MUST be built up in controlled conditions. The idea here is that abbreviated patterns, landing techniques, low thermalling, ridge soaring, final glide planning, or anything else should be thought through and practiced beforehand. Here are the steps to building your toolbox:

Think Through the Theory

Especially as it relates to safety skills, there’s a lot of disagreement over what constitutes reasonable judgment and decision making. For the purposes of this discussion, I will discuss choosing margins related to low thermalling, although you can apply this process to all safety related skills.

If you go on RAS, some people will tell you that thermalling below 1000ft AGL is absolutely insane and you should be thrown out of a glider club should you attempt it. Others will tell you that thermalling at 200ft AGL is perfectly A-OK and no one has any business telling them otherwise.

I doubt that there is any sport that has a 500 percent disagreement over what is reasonable and safe!

I have my own thoughts about these margins, but my objective here is not to proselytize. Instead, you should think long and hard about your goals. The closer you get to the edge, the narrower your margins for error and the greater your risk. Come up with a set of approximate numbers and consider the various contexts that you might apply them.

Note that your margins should be built around less than ideal circumstances. In the case of low thermalling, assume that you will be hot, tired, dehydrated, distracted, on the last day of a competition while in contention for placing well, on a somewhat windy day, near a less than ideal landing option.

Don’t assume you will be 100 percent on your game! Give yourself some room for error.

Consult a Respected Mentor

After you have come up with your limits, discuss them with a pilot you trust. They will provide you feedback and give you a sense if you are in the ballpark given your experience level.

One word of caution is to be careful to whom you gravitate towards. If you look at people in a positive light, the spectrum goes from pilots who are more focused on the sporting side of soaring while others are on the recreational side. The alternate perspective is the spectrum goes from “crazy” to “safety conscious”.

The truth is usually more complicated, but the point is to be careful seeking out affirmation of more aggressive minimums from a pilot that has a reputation for being “crazy”. Regardless of your feelings toward your mentor, you should expect opprobrium from a good portion of your flying club should you apply aggressive minimums if you are a beginner.

Practice in Condor

Once you decide what is reasonable and appropriate, practice these skills in Condor. Put yourself in many different situations and see how your margins play out. Practice thermalling low near airports, fields, in windy and turbulent conditions, etc.

Practice breaking your margins. See what happens when you get a little too far away from your field. What happens when you thermal a bit lower than your minimums? What happens when you thermal too slow and enter a single full spin?

Are your margins robust to failure, or do they require perfection from you to work?

The point is to practice every kind of failure you can think of in the simulator before you attempt it in real life.

Build Your Margins Locally

As you soar in gliding distance of your airport, practice your thermalling techniques and slowly build up your margins. Suppose you decide that your thermal minimums are 800ft AGL. On a non-busy, calm day, maybe take that turn in that thermal near the airport.

Practice your techniques in the real world. These margins now form your toolbox for cross country flying.

Applying Your Margins Cross Country

Approach flying cross country like you are performing at an athletic meet. NEVER do anything that you hadn’t practiced before. When you find yourself in a tricky situation, open up your toolbox and responsibly apply your skills/margins.

If the lowest you are comfortable thermalling near the airport is 800ft AGL, then you should NOT thermal lower than that altitude near a field!

If you are uncomfortable making non-standard patterns at your home airport, you should NOT do anything less than a full pattern into a field!

If you are uncomfortable arriving lower than 1500ft AGL at MC 4 to your home airport on a final glide, you should NOT arrive at an unfamiliar airport with any less margin!

If you are uncomfortable flying a weak ridge locally, you should NOT attempt a save on a weak ridge far away from home!

__________________

In summary, think through the skills you wish to develop, and practice them in controlled circumstances. Develop your toolbox. Practice, practice, and practice some more!

Note that these margins are elastic and depend on your proficiency. Just because you were comfortable doing something once, doesn’t mean that you can be comfortable doing it in the earlier part of a soaring season. Or ten years later after taking a hiatus from soaring. You must consistently assess and reassess your margins.

Think of cross country flying as going to an athletic meet. You are now performing, not practicing! And when you perform, don’t do anything you haven’t practiced before!

I believe if soaring pilots apply this approach to their soaring, they will be a lot safer.

Bringing It All Together | A Lap Along the Local Ridge

It’s a nice day with moderate wind, perpendicular wind direction, and decent thermals. We had towed over to the ridge, tested out the conditions and dropped down on the trees. We are finally ready to soar along the ridge, having trained all of the key ridge concepts and raring to go!

In this video, we do a simple lap from the Upper Reservoir, to the Delaware Water Gap, up to the Millbrook Powerline, and back to the Upper Reservoir. We discuss the local landmarks along the way and some of they key thoughts that come to mind in various stages of the flight.

If any of the concepts or landmarks are not familiar to you, refer back to their respective videos.

It’s worth noting that when the conditions are working well, ridge soaring *feels easy*. And in a way it is; when a pilot has the foresight and skill to choose the appropriate conditions and stays in the wonderful ridge band, there’s little that can go wrong.

But the training, coaching and the practice is to prepare you for that very reason. When you know the traps, have a plan and have the knowledge to extricate yourself from various situations, you will be able to fly the ridge safely.

And this is why there is about 3 hours worth of explanation and context that goes into a 20 minute video of showing how it works when everything goes right.

Introduction to Ridge Transitions | The Catfish Ridge Jump

The purple line is the flight path. We DO NOT fly in the “No fly zone” as this area is dangerous and the ridge works poorly. Instead, we make our transition from the local ridge to the catfish ridge. We often use the “gully line” to find a thermal and good air to make our crossing.

This segment is a crash course in how to do ridge transitions. We start out with the Catfish Ridge transition as it is the first one that many pilots will encounter in their ridge training. This little offset has all the features of a transition and gives our pilots a great way to practice their transition technique.

Ridge transitions often require a lot of attention in a ridge flight. These are areas where we have to cross from one ridge section to another, often due to the shape or current conditions making a section not work well enough to support the glider. These crossings are “hinge points”, as you are more likely to find sink, or a non-working section of ridge while completing a transition. Many ridge-related landouts are due to transitions going wrong.

When a transition goes wrong, you have to execute a landing very quickly in sporty conditions. A couple seconds here or there could make a big difference in the outcome.

Having extra altitude and margin goes a long way to mitigating the risk.

Situational Awareness

While flying the ridge, you should be completely aware of all the transitions on the ridge you intend to fly. You should recognize that you are approaching a transition point as you are flying the ridge. Next, you should have scouted the landing options at the base of the ridge, should the transition go wrong. You should find them and plan out your approach before you begin the jump.

________________________

There are five steps a transition:

Gain altitude (Float up in the ridge band or thermal)

As you approach a transition, it usually pays to slow down early and gain altitude. By working your way up into the higher lift band, you can make the ridge do the work of giving you sufficient altitude, rather than struggling to climb later.

The amount of height you will need depends on the conditions, your experience, and your glider. We often give some numbers for pilots to start out with, such as ~2100ft MSL for the Catfish Ridge transition. When we provide these values, we are giving pilots “the highest common denominator” with respect to altitude. The height that you would make it across assuming you run a bad line with a less favorable wind direction. But with more experience, you can judge the conditions on a day-by-day basis.

Pick your line

A big decision is deciding where you are going to jump off from. The simplest way to do it is to simply find the shortest line; get as high and as close as you can to where you want to go and make a beeline across to the other side. However, this neglects the effect of the air in between. Often transitions will have thermals or energy lines that line up consistently due to local terrain features. It often pays to run “a good line” upwind and maintain higher altitude rather than simply taking the shortest path. Conversely, making a transition in strong sink into a strong headwind will make your altitude evaporate very quickly and you may not make it across.

Probe the air

When you start a transition, you are not immediately committed to going all the way across; you can test out the waters. If the transition is working out well and you are generally maintaining your altitude, that’s good. If you start hitting sink and dropping out, you can still turn around and try again.

Point of no return

There is a point when you can no longer get back to the ridge you started from. You must recognize and acknowledge this point as you do your transitions. Once you have gotten beyond the point of no return, you will either make it across, or land in a field that you have scouted out in case the transition does not work out.

If you have extra altitude and you are going upwind, your point of no return can be delayed quite a while. Downwind jumps will reach this point a lot earlier as you get blown too far downwind to make it back very quickly.

Commit to the transition

This is less the case in small jumps like to the Catfish ridge, but there are instances in large transitions that you get beyond the point of no return and may or may not be able to make it across. This is the case such as if you are trying to do big upwind transition and you are in the middle of the valley, considering whether you have enough energy to safely go over the top of the mountain. During this stage, you are considering your landing options along the way. As you get closer, you decide whether you will want to commit to the transition and continue over the top of the mountain.

__________

Doing Transitions Low

In the videos, we explored how to do transitions by the book and what happens when you do them marginally. As you get lower, factors such as the wind direction can play a significant role as to whether you will make it across or not. If the wind angle is off and you have a significant headwind component, you may have to go a long way into lee sink, headwind and around a corner to find a working section of ridge. You will lose a lot of altitude along the way.

Next, we see how the stages shift based on your margins. If you’re low, you will reach the point of no return sooner. This commits you much earlier and you are taking a greater chance of coming up short and landing in a field.

In sum, a couple hundred feet here or there makes a BIG difference in ridge transitions. Stay ahead of the steps, know your outs, and maintain your margins.

Off-Angle Wind

When the wind angle shifts more than 30 degrees off from perpendicular, the ridge lift becomes less reliable. As a result, we strongly recommend that beginners “stick to the formula”; wind speed 15-25 knots at ridge top, within 30 degrees of perpendicular for the section you are flying. In these conditions, you can generally expect the well-flown ridges to have “robust” ridge lift. This is to say that the ridge lift should be consistent and reliable; few factors can suppress or significantly affect the ridge band.

However, when the wind is outside the formula, this is not to say that the lift shuts off. Instead, there are many more complications that can affect how the ridge band works. Certain sections may work very nicely, while other sections are completely flat. The high part of the band may allow you to float at a moderate speed, whereas the low band may not be working.

With experience, it becomes possible to anticipate these factors. That said, it requires flying on many days, progressively exploring the ridge, and building up your margins. Intermediates may explore these days in the comfort and safety of the local ridge and experts may take advantage of these days going cross country.

While I do not advise beginners to fly on an off-angle ridge, beginners should nonetheless have a sense of what to expect if the wind angle shifts, for instance if the conditions unexpectedly change over the course of the day.

The more off-angle the wind is, the higher off the ridge you have to be.

As the angle shifts, the air becomes violent down on the treetops. There will be a turbulent wash as the wind angles over the mountain. By the time the angle is 45 degrees off, you typically have to be at least 300ft-400ft above the trees for the band to work well. Aside from being turbulent, the lift will typically be disorganized and weaker lower.

The more the angle shifts, the higher you must float along the ridge.

If the wind is on the weaker end of the spectrum (<20 knots) and/or the thermal activity is limited (think overcast above), the high band will get weaker.

If the wind is weak and/or the thermal activity is suppressed, watch out. This will weaken the high/float band. This is a really big problem! The lift band becomes compressed; it becomes only possible to float at best glide speed at 2000ft MSL or so and you cannot get higher or lower. It takes very little for this lift band to weaken to the point where it will no longer sustain you.

If the wind is weak/moderate and/or the thermals are not working well, do not count on an off-angle ridge.

Expect substantial sink when encountering thermals on the ridge.

Watch out for thermal suppression, especially when heading into a quartering headwind. Recognize that you will be approaching the thermals on a cross angle. This means you will need to traverse a long band of sink before you encounter the lift.

If the ridge band is not working well and the thermals are strong, you can easily get flushed down to ridge top. Moreover, this effect worsens as the wind angle increases. For example, if the wind angle on ridge top is 45 degrees off, but the thermal street above angles 55 degrees off at cloudbase, you may traverse 5-10 knot down sink over the course of a half mile! This amount of sink could be enough to knock a glider off a ridge, especially a low performance ship.

Watch your airspeed while down at ridge top.

When going upwind, your ground speed will be very low. However, when you turn downwind, your ground speed will be very high. When heading downwind, it is easy to let yourself get dangerously slow if you are not paying attention. The trees will be flashing by very quickly, giving you the illusion of flying a lot faster than you really are.

Certain ridges are tolerant of an off-angle wind; others are not.

Generally, ridges that are fairly high, straight, have few upwind obstructions, and few issues like gaps, bowls and spurs are more tolerant of an off-angle wind. Conversely, any of these issues will cause a ridge not to work in a given section if the angle is sufficiently off. A ridge with many issues may not work with a wind angle greater than 30 degrees off.


In summary, when the angle shifts beyond suggested tolerances (+- 30 degrees), the conditions become marginal. This makes flying in these conditions an expert endeavor. However, the lift does not necessarily go away. With practice and experience, you may still find a solid working ridge band. And if the conditions unexpectedly shift, you will know what to expect.

The Downhill Trap

As you fly the ridge, you must pay attention to how the mountain is changing ahead of you. One important change is if the elevation of the mountain is increasing or decreasing. If the mountain is getting lower ahead, be careful!

The solution is to maintain a constant altitude over a low section of ridge. If you’re able to maintain a selected altitude, then you’re doing well. If you start settling down, be ready to turn back on a moment’s notice.

The downhill trap occurs when you drive along the ridge while maintaining constant altitude in relation to the crest, but you are in fact sinking down along a descending mountain. The lift could be pretty weak, but yet you could maintain high speed down on the tree tops.

When you run out of mountain ahead of you and turn around, you will instantly find yourself low and slow. You will see the mountain extending way above you. At best, you will limp along in weak lift trying to climb along in the increasing elevation, scared out of your wits. At worst, you will promptly fall off the ridge.

The Blairstown ridge extending from Sunfish Pond to the Delaware Water Gap is an example of a section that has this trap. As you build experience and prepare to fly the local ridge, pay special attention to this area and don’t make this mistake!

Falling Off the Ridge

What happens when the wind is too weak to sustain a glider at ridge top? You will settle down lower and lower, until you almost get down to ridge top. Then, you will immediately have to leave the ridge and head toward a landing option.

This process happens very quickly. If you’re 400 ft above the mountain and the ridge is not working, you will be down at ridge top in as little as two minutes. The trees will be filling in your canopy very rapidly.

Note that you will NOT settle into an “equilibrium point”. No matter how low and slow you get, you will NOT sustain at ridge top.

Maintain your airspeed at least at Best Glide Speed with the ridge coming up at you, it will be tempting to pull back to keep the nose level with the mountain. Watch your airspeed like a hawk and don’t be tempted to pull that stick back and get any slower.

Plan on leaving the ridge at 150ft above the trees. Settling down lower and slower will rarely help you and yet the risk of doing so is very high.

Once you leave the ridge, transition immediately into a landing mindset. You will be down on the ground in the next 2-4 minutes. Take a deep breath. Do your landing checklist. Focus on making a nice landing.

Recovering From Below Ridge Top

You should not put yourself below ridge top. Should you attempt recovering below ridge top, you will be forced to fly low and slow in weak lift while in gusty conditions. This is dangerous. If you are a beginner, you must maintain good situational awareness and judgment to avoid these situations.

However, the Aero Club Albatross ridge training syllabus demonstrates a below ridge top recovery so that pilots: A) Understand how the ridge band works below ridge top, B) Are equipped with the knowledge to safely recover should they choose to.

1. How do we find ourselves below ridge top?

There are two ways to fall below ridge top. One way is because the ridge is too weak to sustain you above. In such a case, you should immediately leave the ridge and head for a field in the valley below. If the ridge is not working above ridge top, it will certainly be no better further below. A good minimum for a weak ridge is 150ft above the trees at Best Glide speed. Note that this is a minimum. Mentors and coaches would be wise to advise beginners to fly in considerably stronger conditions.

Also, a pilot can fly lower and faster if they would like to, but the ridge needs to be commensurately stronger allow them to go 10+ knots faster 50-100ft above ridge top.

If you settle down to ridge top, then expect to leave in short order.

The second reason we can find ourselves below ridge top is if we are transitioning low from elsewhere to a working ridge. For example, if we are crossing a gap and encounter sink in the middle of the transition.

Beginners should be doing transitions with ample energy so that they don’t end up below ridge top on the other side.

2. Does a ridge work below ridge top?

Sometimes yes, sometimes no. It depends on the wind speed, direction, and shape of the mountain. If the angle is off, you will often find the wind funnels parallel below ridge top and the lift works very poorly. If the angle is closer to perpendicular, there is a better chance that it will work. The next factor is wind speed. Sometimes the wind at ridge top is sufficient for the ridge to work well, but when you get 100ft or more below, the wind weakens to the point that the lift can no longer sustain a glider. The final factor is ridge shape. Usually a ridge flattens out toward its base. If the slope becomes sufficiently flat, even a strong wind will not deflect sufficiently upwards to sustain a glider.

However, if the slope is sufficiently steep, the angle sufficiently good and the wind sufficiently strong, it can be possible to recover 1/3 to 1/2 of the way below ridge top.

3. What is the technique for recovering below ridge top?

The first step is to select an appropriate airspeed. Usually best glide speed is a sufficient minimum airspeed. Next, slide into the ridge band at a flat angle. You will need to be right up against the trees as the lift band below ridge top is usually very narrow. Expect the lift to be weak; it can take a long time to work your way up. As you fly in the weak lift, avoid the temptation to turn in little gusts as you are more likely to lose more altitude than you will gain in the turn.

At any time, be prepared to turn away from the ridge. If you hit sink or turbulence, be on a hair trigger to turn away from the ridge and give yourself more room underneath you.

If you do decide to turn, recognize that you probably have only one shot. If you can complete the turn in lift, you will do well, but if you lose 50-100ft by misjudging the turn, you will likely fall into weaker lift below you.

_____________________

If this discussion sounds scary and risky, that’s because it is. Recovering from below ridge top is an expert maneuver and is not recommended for beginners. However, we emphasize these techniques for general knowledge and safety. At some point you may encounter a situation that requires applying these techniques. As a result, we train pilots such that they are familiar with what to do in these situations.